Sipping tea with Alexa

Our goal
The amount of time a specific tea steeps, and at what temperature water makes a big difference in the resulting flavor palate. This is a topic I have covered extensively on Tea-Guy.com.
The goal for this simple project is to be able to ask Amazon's Alexa digital assistance to run a timer for the type of tea, where the time is predetermined based on that tea type.
For the project, we'll evolve the skill from something very simple where the skill accepts a single command and invokes a timer assuming a generic black tea as the type. The end goal will include deeper logic surrounding synonyms of terms for different kinds of teas and tisanes for more user-friendly handling.
TL;DR
In this tutorial, we create an all-new Alexa skill to run special timers based on the kind of tea uttered by the user. You can find the code examples for this project using the following links to my GitHub profile, repeated at the end of the tutorial as well.
- Blank initial project downloaded from the Alexa developer console
- The completed and operational Alexa skill, as created in this tutorial
Prerequisites
- A free Amazon Alexa developer account
- An understanding of Node.js, JavaScript, and JSON
- An understanding of Git and source control tools
- A text editor or IDE for writing Node.js, Javascript, and JSON code (I recommend VS Code, also free)
- A device with Alexa enabled using the same Amazon account as your Alexa developer account
How to read this tutorial
Code will be visible in markdown blocks like the one below. These code examples will evolve as we proceed.
{
    "key": "value"
}
Reference the Github project links at the bottom of this tutorial for both starting and completed code.
Specific notations will be made throughout using colored panels for clarity. An example of such a panel is the following:
Agenda
We'll walk through the following steps as part of this tutorial.
- Create the new Alexa skill in the developer dashboard
- Update the invocation term (how Alexa knows to use the skill)
- Activate the Timers permission for the skill
- Get settled in VS Code
- Review & update the interaction model file
- Update the NPM package.json file
- Review handlers for default intents
- Create a handler for the custom intent to brew tea
- Save, build, deploy, and test the project
- Let's get fancy (adding slots and synonyms)
- Download project files
Let's do this
Create a new Alexa skill
If you're new to the Alexa developer console, there are a variety of options here, but we're going to keep things simple.
There are solid extensions for VS Code created by the Alexa Skills team at Amazon, hosted on Github. It's out of scope to cover these here, but I will assume their use later on when we transition to writing the JavaScript code for our skill.
- Click "Create Skill" from the dashboard
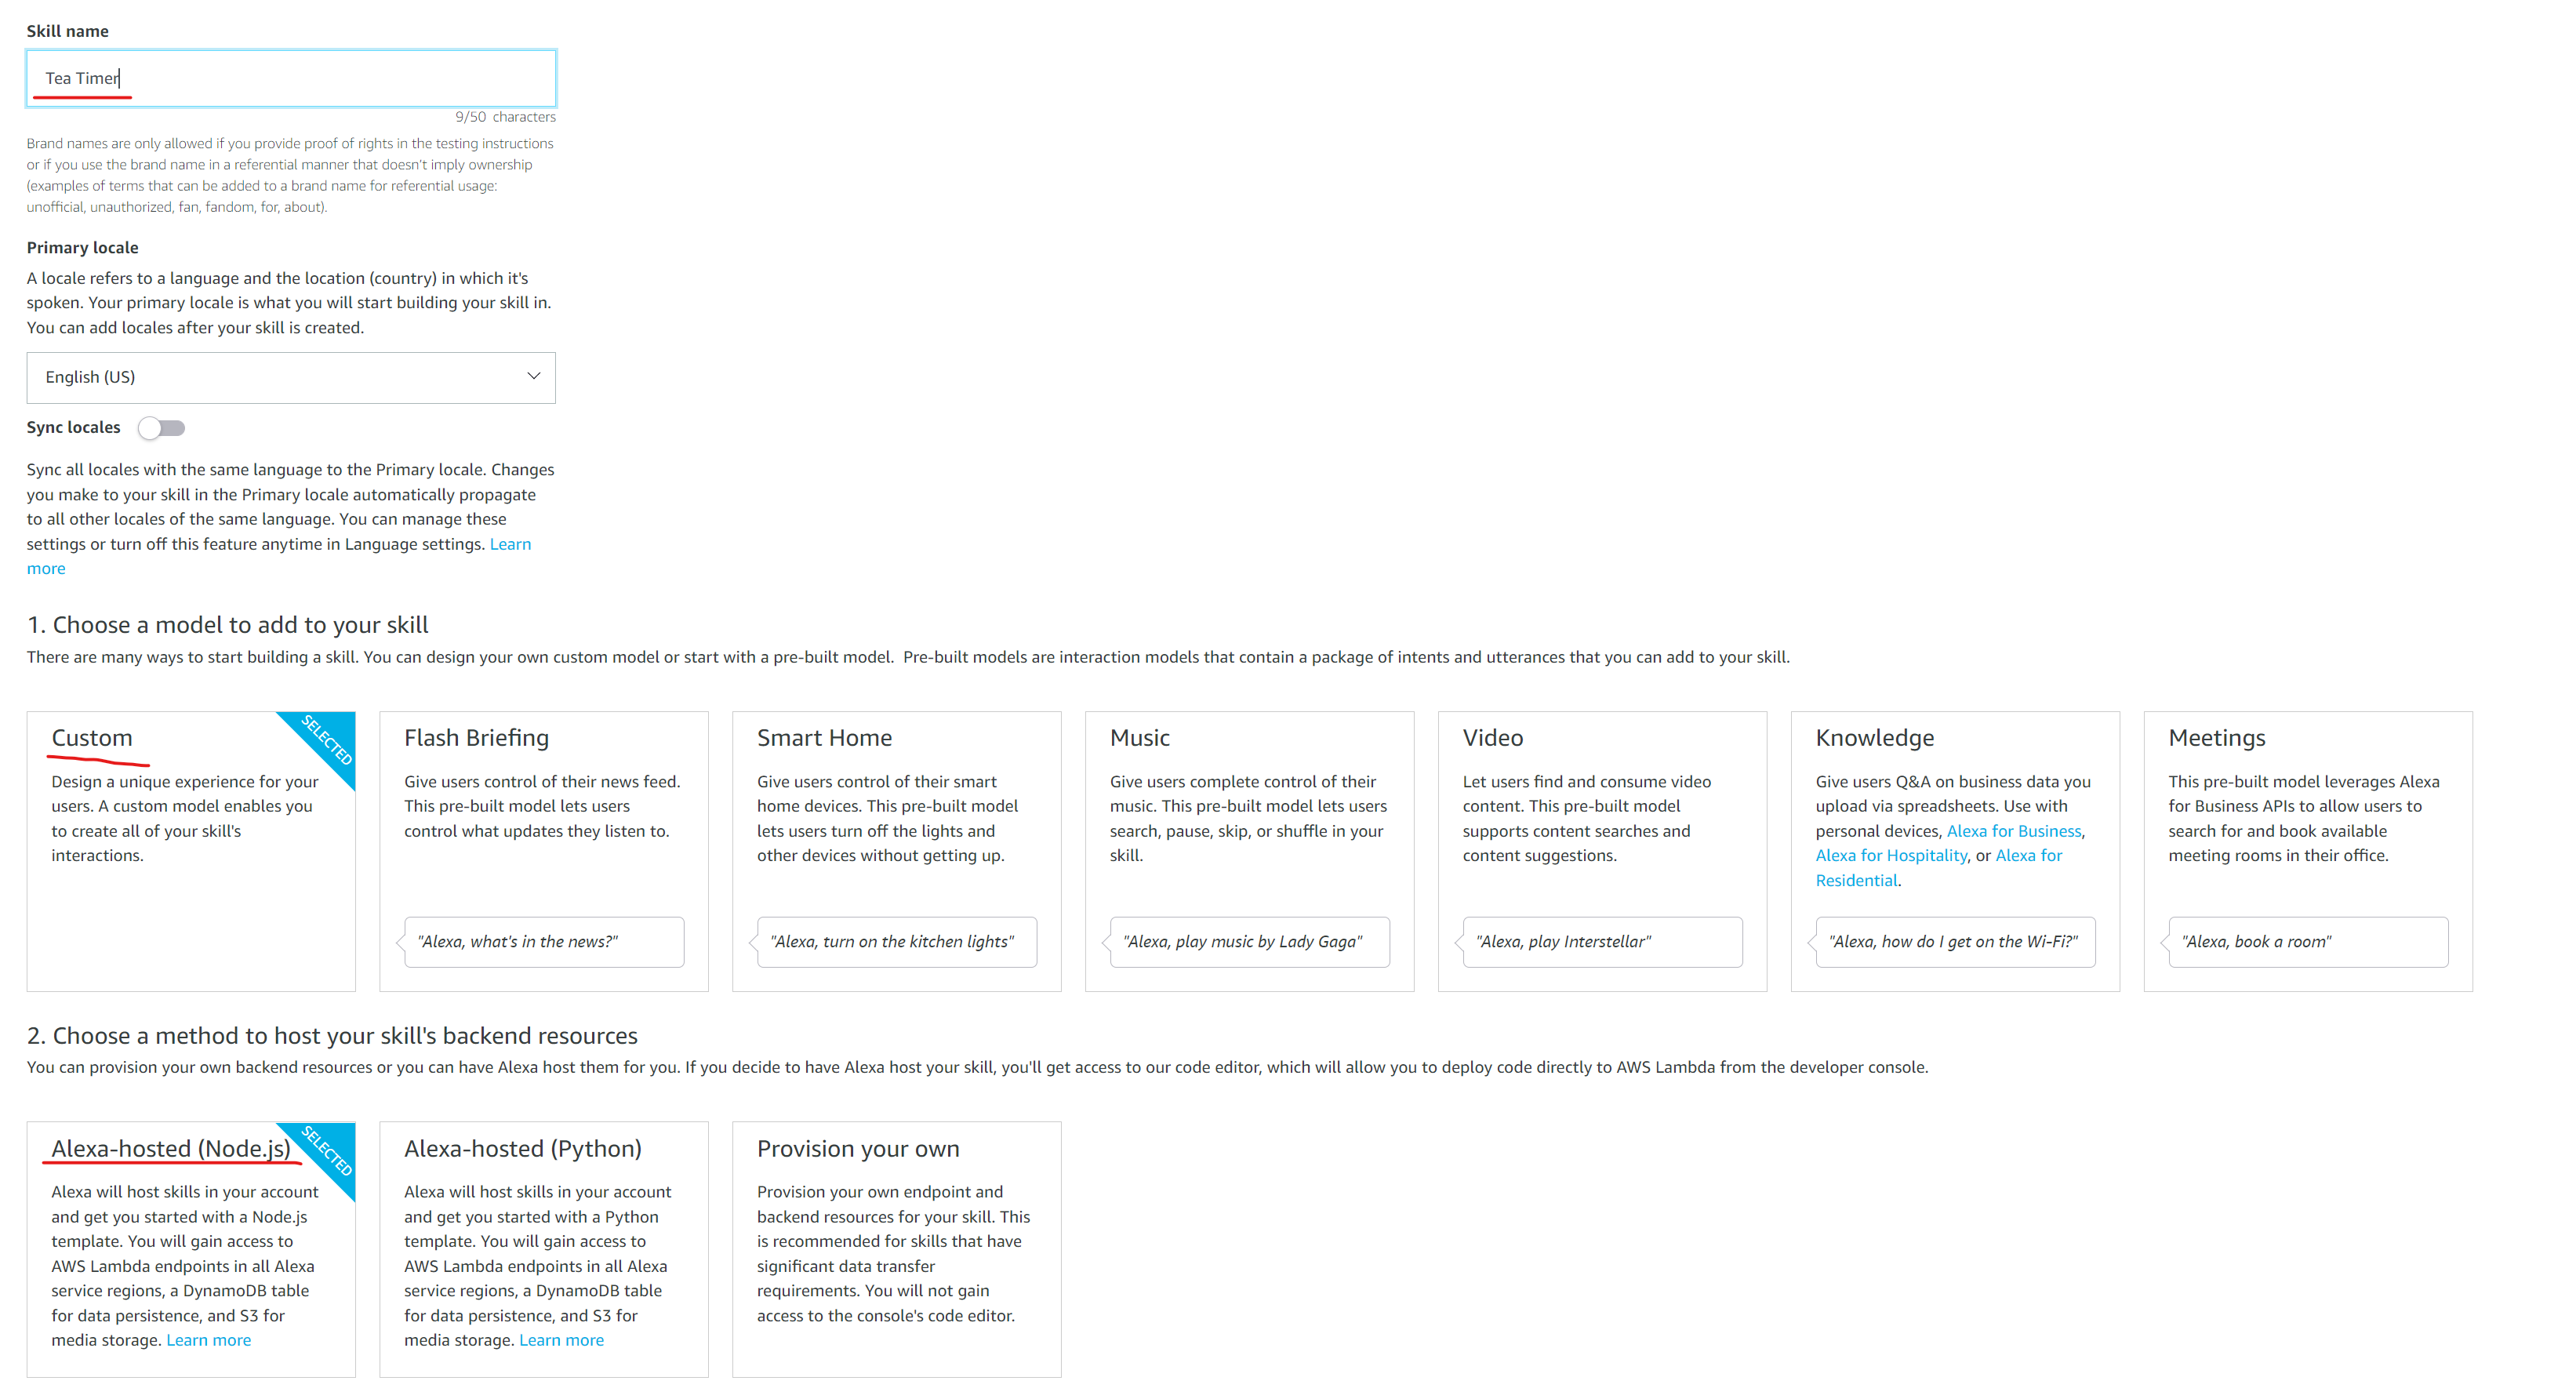
- Enter a name for the skill (I've chosen "Tea Timer")
- Choose a "Custom" model
- Choose "Alexa hosted (Node.js)" for the backend
- Click "Create Skill" in the upper right
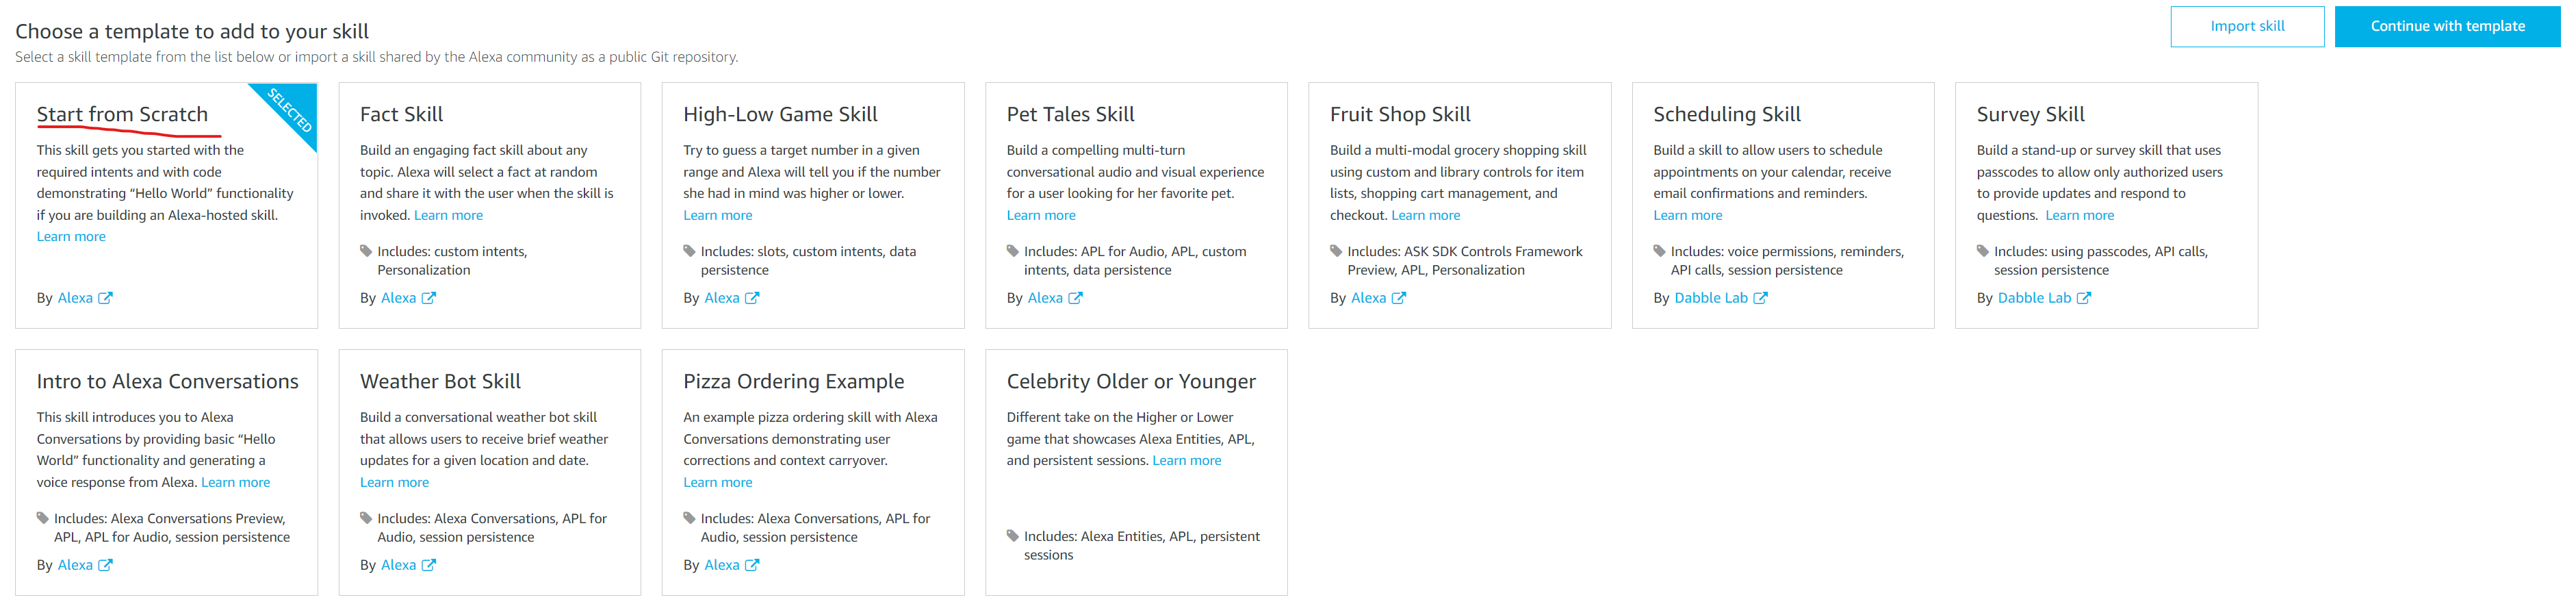
- On the resulting screen choose "Start from scratch"
- Click "Continue with template" in the upper right
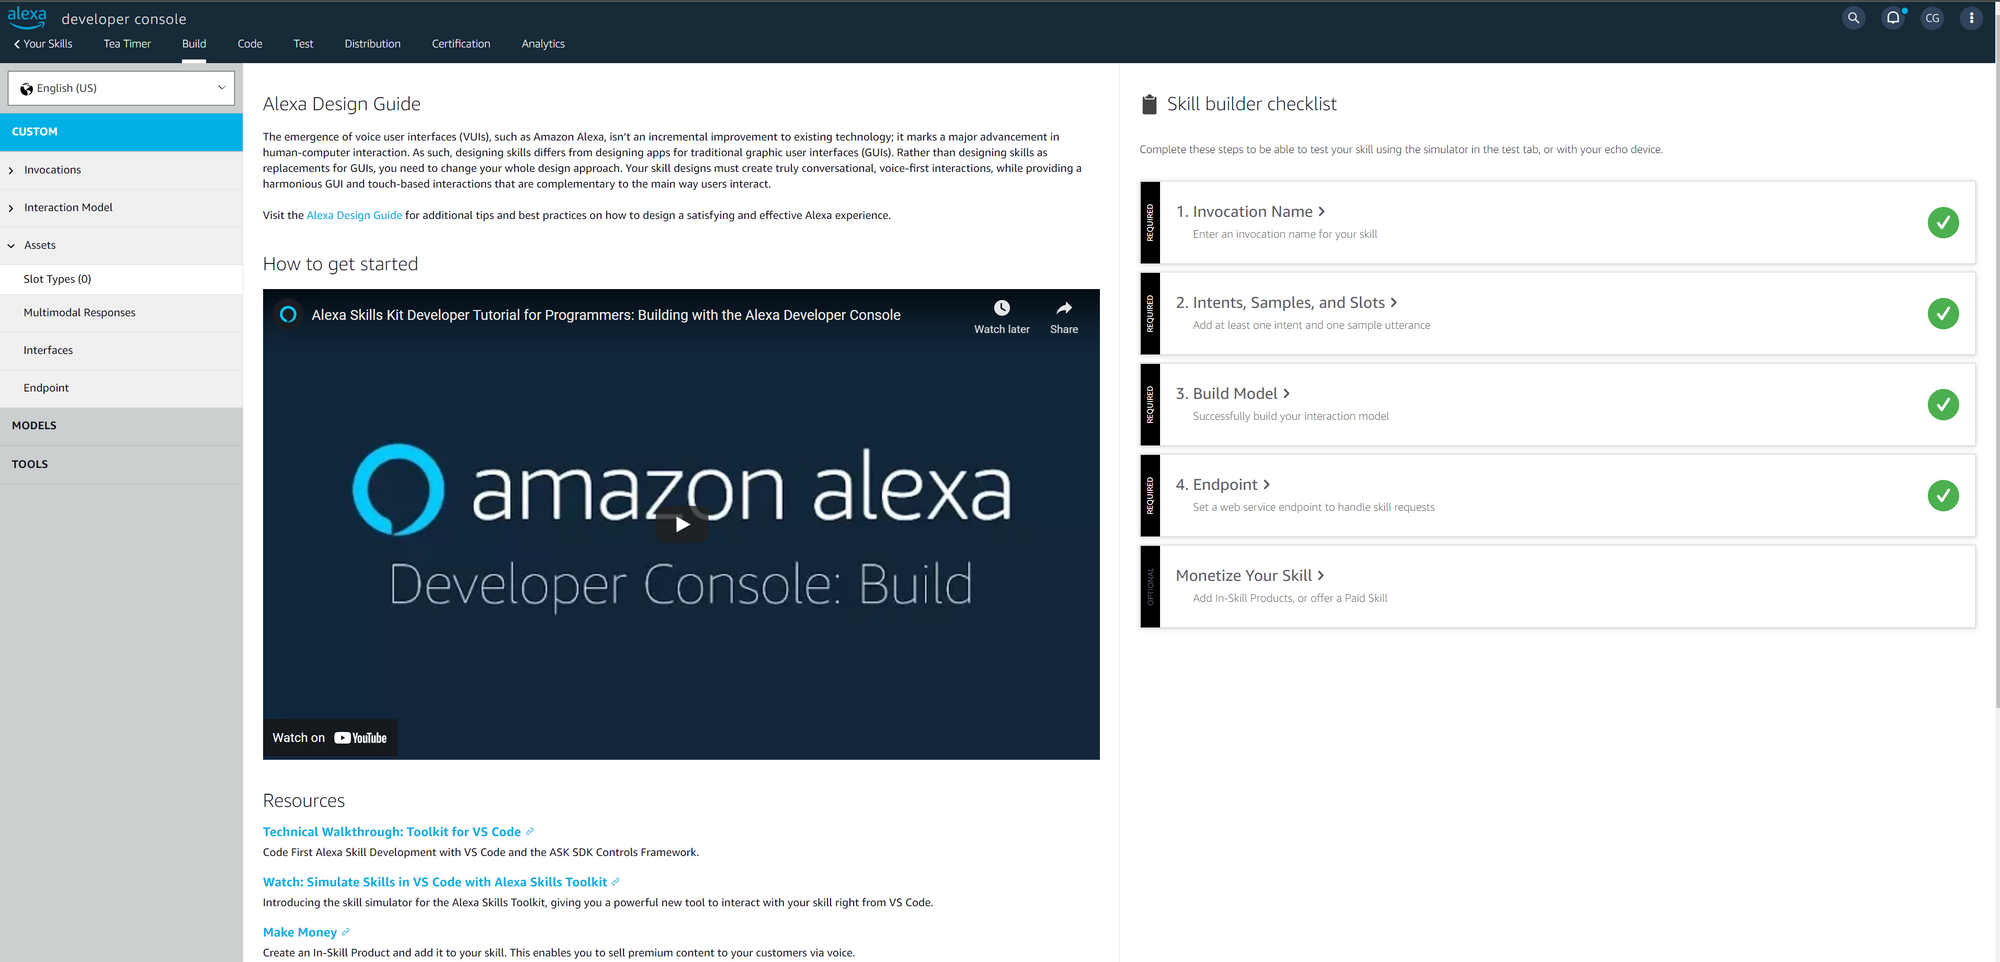
These steps will generate a stub of the new Alexa skill and drop you into the skill's Build configuration screen. There's nothing really here yet, but you'll likely see a notification that initial build and deploy activities have been successful.
Change the invocation name
The invocation name is the phrase a user will speak (utter) in order to engage the skill through their Alexa devices.
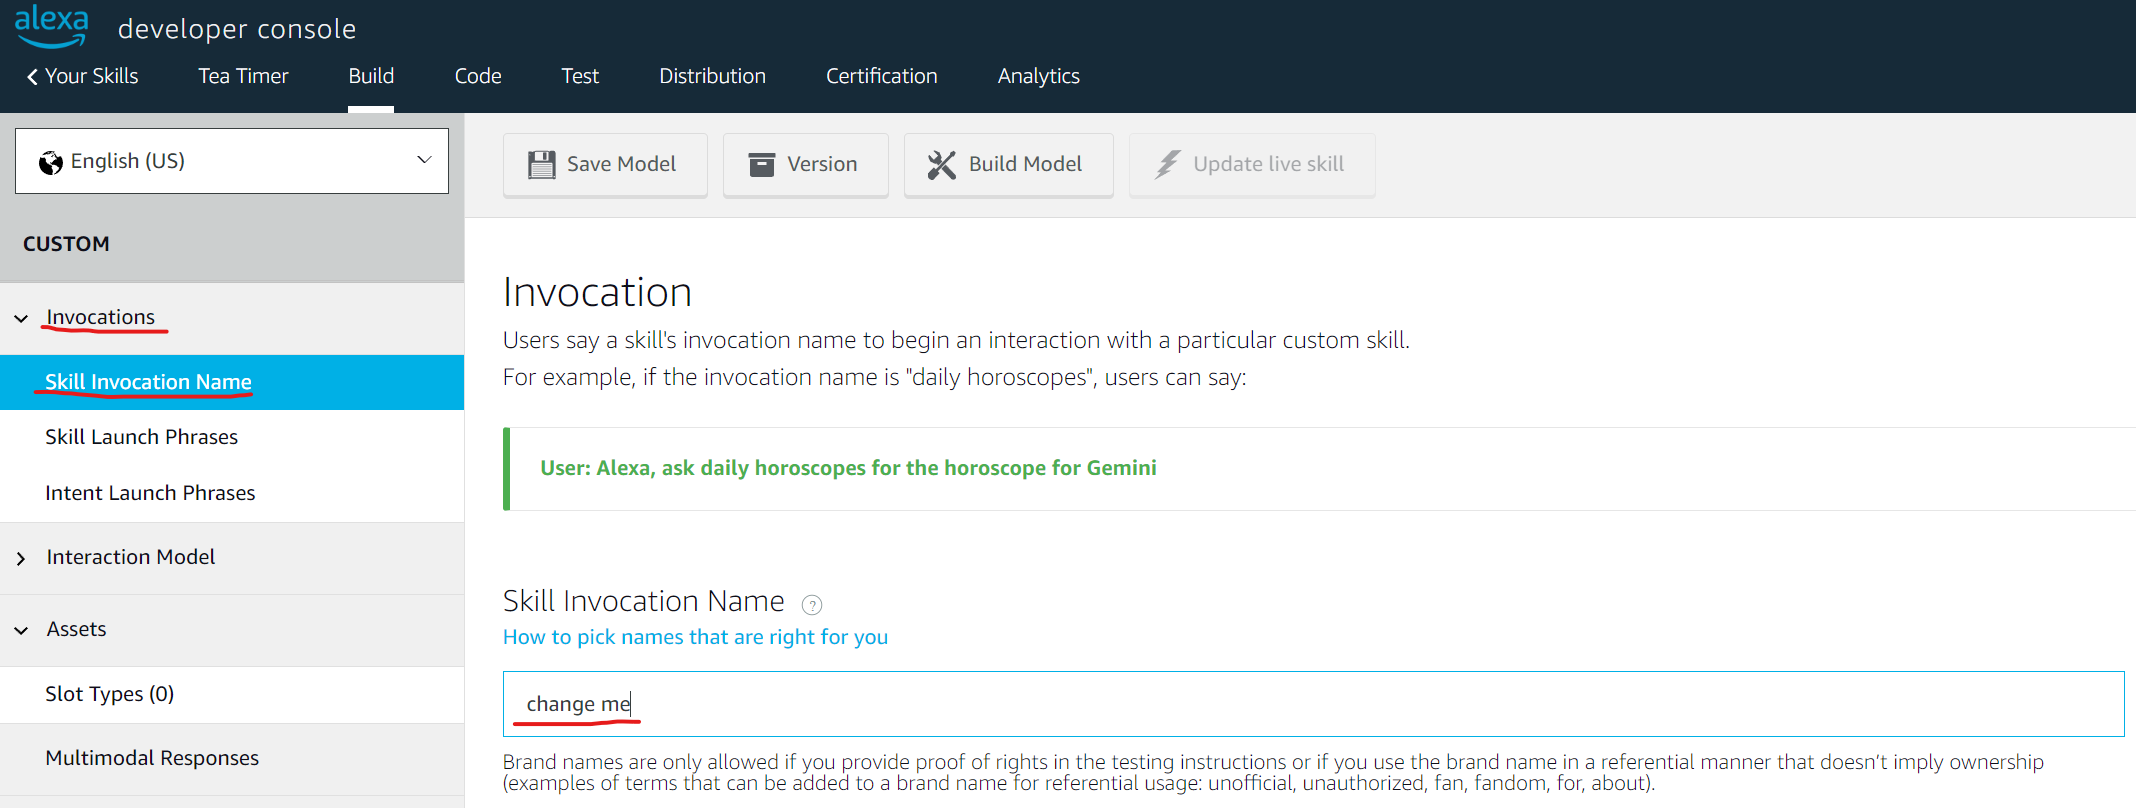
The default provided for a new custom skill is simply "change me". But this will not suit our purposes, and we should change it. I recommend "tea time", but you can choose any phrase you like (e.g. "beam me up" or "now steeping").
To change this value, open the "Invocations" navigation under Custom to the left. Then select "Skill Invocation Name" and enter your new invocation name.
Finally, Alexa won't recognize this change until you save the model and build it.
- Click "Save Model" above the field you edited
- Once the save is confirmed, click "Build Model" a couple of buttons to the right
Activate Timer Permissions
It's an interesting design choice on Amazon's part, I have no doubt it's for security and user experience reasons. However, an Alexa skill needs to request one-time permission from the user to allow the skill to create and manage timers on their behalf. As the developer, we need to tell Alexa that this skill needs to seek permission from the user.
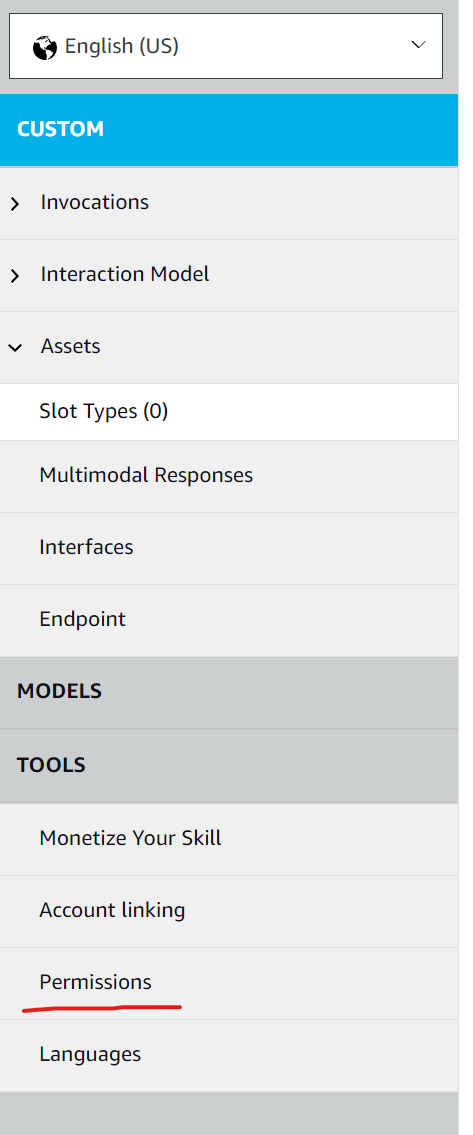
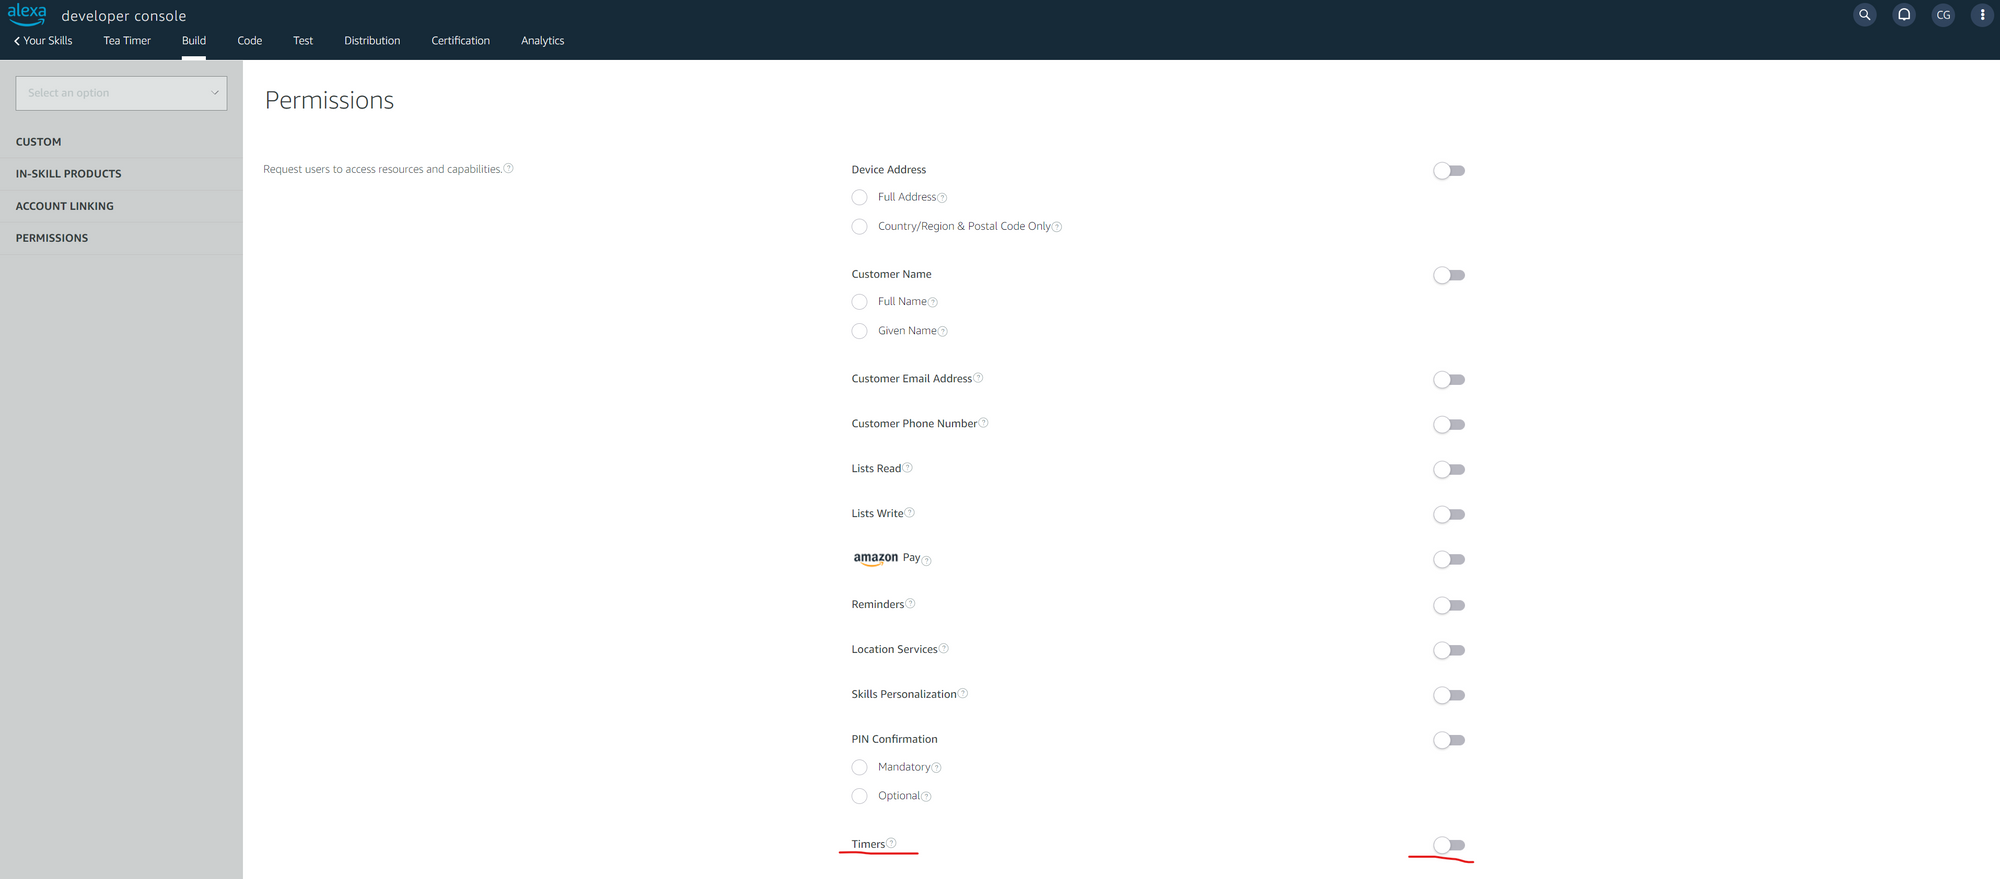
To do this, select "Permissions" under the "Tools" heading at the bottom of the left navigation.
The resulting screen has a variety of permission toggles. Toggle "Timers" to active at the very bottom of the list.
Time to get dirty with some code
You can do most of what you need using just VS Code and the Alexa Skills Toolkit if you like, but there's no effective way to test timers using the CLI or web console, so you'll need an Alexa-enabled device for testing when it's time to do so.
Clone the Alexa skill project
Please reference the GitHub repo for those extensions for a walkthrough on installing, configuring, and logging in to your Alexa developer account so you can follow along.
Note. You can certainly copy/paste your code into the Alexa developer console, or even directly make your code edits in the console, though this is not as developer-friendly, or a good practice (in my opinion).
Once installed and configured, to use the Alexa Skills Kit extension for VS Code, and assuming you're logged in with a profile configured (note: requires a git install), click the Alexa Skills Kit extension in the left navigation of the VS Code UI.
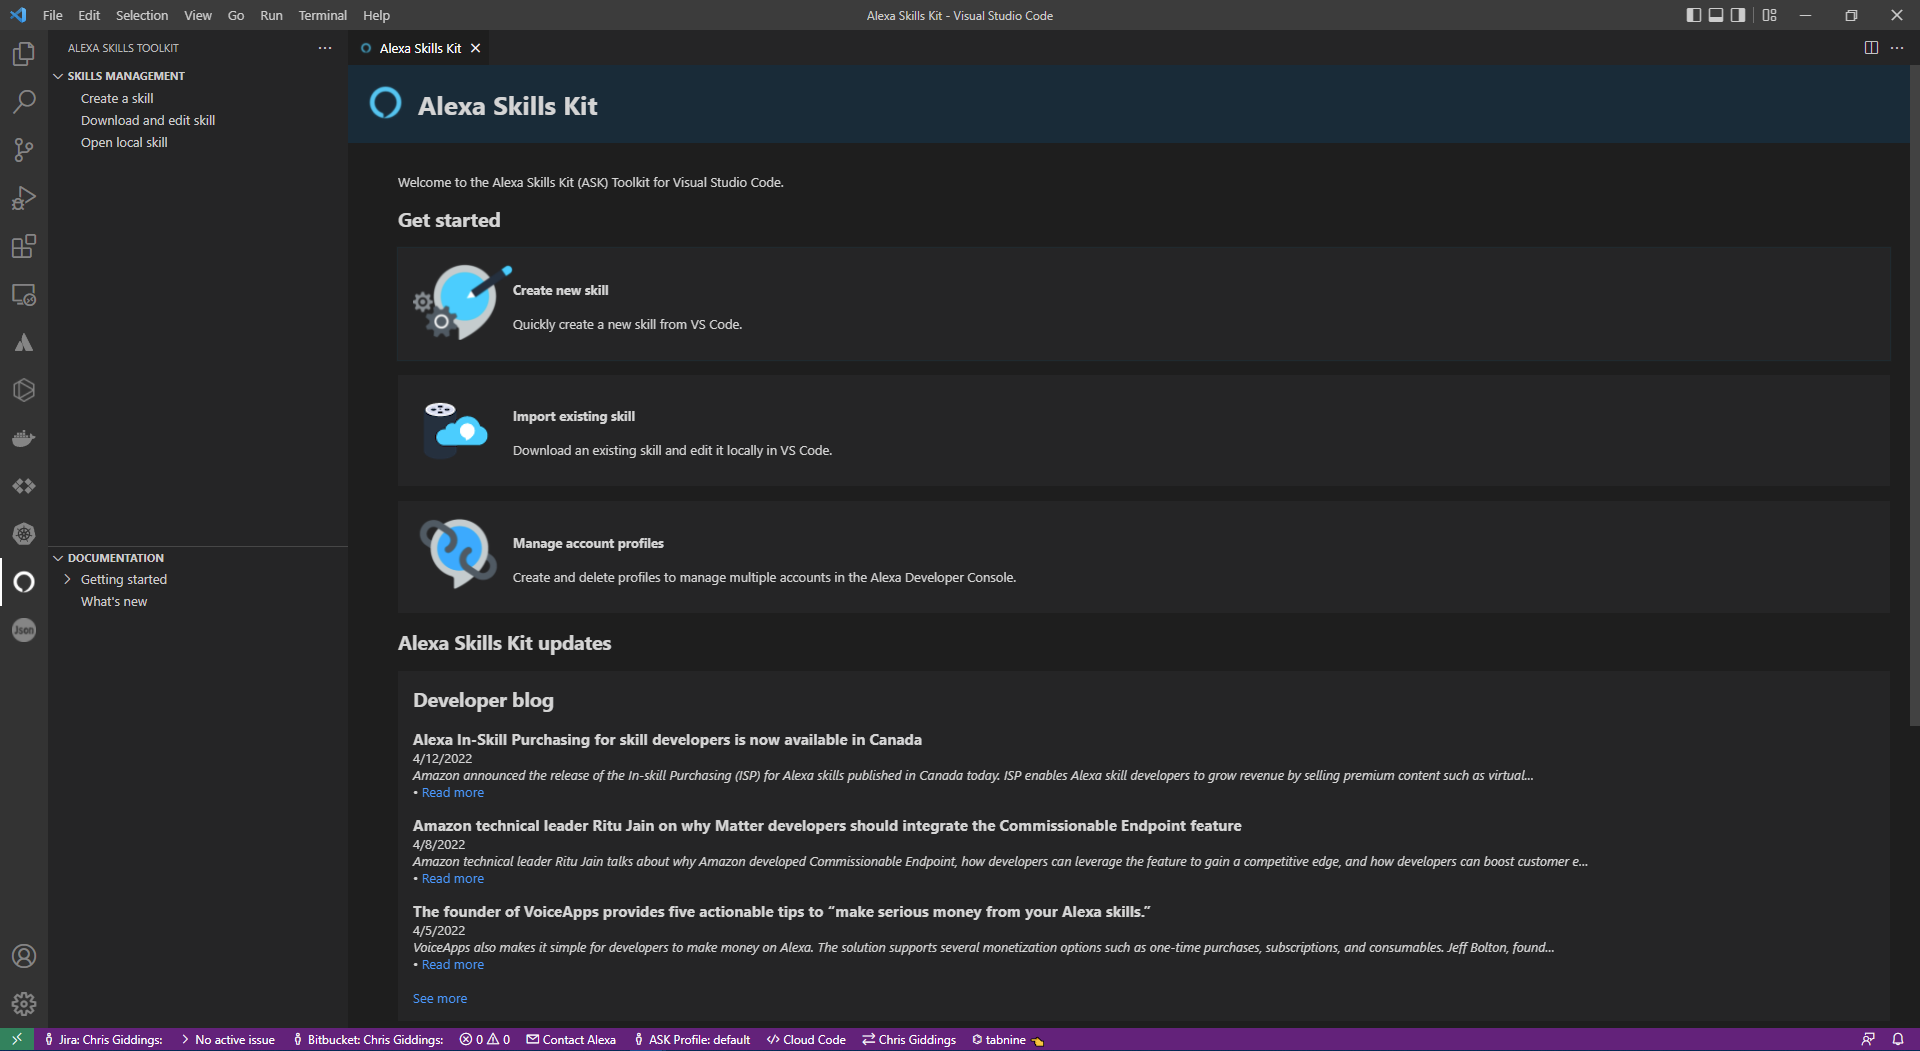
From here, a secondary area loads where you might normally see a file browser or project view, depending on your setup.
There are a few options here with the ASK extension:
- Create a skill
- Download and edit skill
- Open local skill
For this exercise, since we already created the skill in the developer console, you can choose "Download and edit skill". This will present a popover list of any skills you have tied to the Alexa developer account you logged in with. If you have many, the list can be filtered by name by typing in some text for the filter to match.

Select the new skill you created earlier in this exercise, select a place for the files to be copied locally, and watch as the ASK extension automatically clones the project code and details from the cloud to your local system.
Examining the skill's initial contents
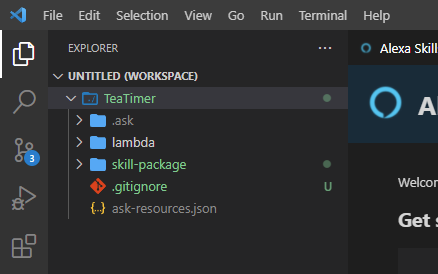
When first cloned, the skill is very basic. It has no "wiring" to connect anything together yet, we will get to that. But, assuming you're new to the Alexa skill community, it's maybe helpful to cover some specific elements.
Every Alexa skill has a set of regions it can be deployed to. You can set these later in a project, but you likely selected a default region for deployment when first creating your Alexa developer account. For example, I deploy to US East - Virginia.
- The
lambdadirectory will hold our code for AWS lambda functions. We'll focus mostly on index.js - The
skill-packagedirectory holds central configuration options for the skill itself. This includes theskill.jsonfile which handles general skill description details for the packaged skill and how it appears in the Alexa skill market. It also holds the directory and files forinteractionModels, which we will define later. Interaction models are linguistically bound, meaning the user's spoken language needs to be localized. We will focus on only US English (en-US.json). - The .gitignore file is used to ignore certain files from the filesystem. We will be updating this right away.
Update the .gitignore file
The default .gitignore file looks like this:
ask-resources.json
.ask
.vscode
lambda/node_modules
We need to extend this by adding the following lines to the bottom:
node_modules/
hooks/
_dev/
Together these should cover our needs for this project. The Alexa environment simply doesn't need these extra files and details clogging everything up.
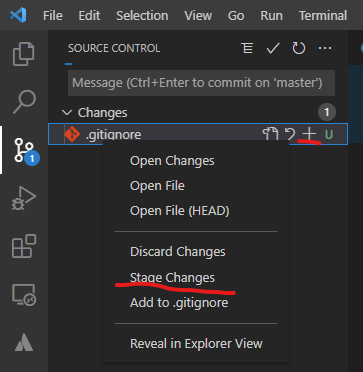
Make your changes, and save the file. You should see an M to the right of the file name in the list, indicating the file has been modified.

Go ahead and stage this change before we proceed with other alterations.
To stage your change, click on the "Source Control" tab at the left in VS Code. From there you can simply click on the (+) icon to the right of the file name, or you can right-click for a context menu and choose "Stage Changes".
Updating the skill interaction model
Next, let's take a look at the interactionModel. The file for this should be named as en-US.json if your project is set to US English by default. The file itself is located in skill-package/interactionModels/custom. We will reference this file frequently later, but we'll make some basic edits now.
// lines from the code if you go to copy/paste from the code examples.Any new skill has a series of default intents added. While you could technically remove them, it's bad form to do so. Although we will update the AMAZON.FallbackIntent later, we will be leaving the following intents alone:
AMAZON.CancelIntentAMAZON.HelpIntentAMAZON.StopIntentAMAZON.NavigateHomeIntent
Our primary focus will be on replacing the HelloWorldIntent included by default in this custom skill project.
But first, let's have a quick review of the structure of this file.
{
  // The interation model is at the top level of any skill and defines
  // the breakdown of the skill from there

  "interactionModel": {

    "languageModel": {
      // The invocation name is something we updated in the web UI,
      // and may not be reflected in the file when you go to pull it down
      // it is okay to alter the invocation name here as well

      "invocationName": "tea time",

      // Intents are the core of most conversational systems using natual
      // language understanding technologies. In short, the goal is to
      // understand the intent of a user and perform actions (fulfillment)
      // of the user's request based on the intent

      "intents": [
        {
          // A default intent for a user to cancel their requested action

          "name": "AMAZON.CancelIntent",
          "samples": []
        },
        {
          // A default intent for a user to get help with the skill

          "name": "AMAZON.HelpIntent",
          "samples": []
        },
        {
          // A default intent for the user to stop the skill's execution

          "name": "AMAZON.StopIntent",
          "samples": []
        },
        {
          // This is a custom intent, note that it isn't prefixed with AMAZON
          // and we see some sample "utterances" for the intent helping Alexa
          // to understand what a user may say to trigger the intent

          "name": "HelloWorldIntent",
          "slots": [],
          "samples": [
            "hello",
            "how are you",
            "say hi world",
            "say hi",
            "hi",
            "say hello world",
            "say hello"
          ]
        },
        {
          // A default intent allowing the user to return to the skill's
          // default prompt

          "name": "AMAZON.NavigateHomeIntent",
          "samples": []
        },
        {
          // A default intent to catch all user input which doesn't seem
          // to match a defined intent for the given skill, if say a user
          // asks to purchase more tea, but our tea timer doesn't provide
          // purchase functionality

          "name": "AMAZON.FallbackIntent",
          "samples": []
        }
      ],
      // Types allow for custom definition of selectable options, and
      // for more complex conversations leveraging "slots" and "synonyms"
      // which will be covered later in this tutorial

      "types": []
    }
  },
  // Version defines the version of the skill

  "version": "1"
}
Alright, now that we've taken a look at the file's structure, and have somewhat of a better understanding of what each pre-existing element does, we can start to poke around and make some changes.
Here our intent is listed as HelloWorldIntent, let's go ahead and replace that with something more meaningful for our Tea Timer skill. I have chosen to use BrewTeaIntent, which I think is a bit on the nose, but nicely lacks ambiguity.
The samples also do not match our needs, so we can update those now, as well. I have provided my configuration below, but you may use your own or add on to what I've provided. Regardless, the samples should match a pattern where the user would utter a phrase like so:
Alexa, tea time, brew tea
{
  "interactionModel": {
    "languageModel": {
      "invocationName": "tea time",
      "intents": [
        {
          "name": "AMAZON.CancelIntent",
          "samples": []
        },
        {
          "name": "AMAZON.HelpIntent",
          "samples": []
        },
        {
          "name": "AMAZON.StopIntent",
          "samples": []
        },
        {
          "name": "BrewTeaIntent",
          "slots": [],
          "samples": [
            "brew",
            "brew tea"
          ]
        },
        {
          "name": "AMAZON.NavigateHomeIntent",
          "samples": []
        },
        {
          "name": "AMAZON.FallbackIntent",
          "samples": []
        }
      ],
      "types": []
    }
  },
  "version": "1"
}
Go ahead and save your changes, and stage them.
That's it for our interactionModel for the moment. We will make changes again later when we come back to extend the skill. But we can move on for now.
What cute packaging
Next, let's take a peek at package.json located in the lamda folder.
This file is nice and succinct and is a simple NPM package file.
Let's just update the package details to replace the hello-world entry with our own. My finished copy is below. We should not need to revisit this later.
{
  "name": "tea-timer",
  "version": "1.0.0",
  "description": "Alexa utility for brewing better tea using timers.",
  "main": "index.js",
  "scripts": {
    "test": "echo \"Error: no test specified\" && exit 1"
  },
  "author": "Amazon Alexa",
  "license": "Apache License",
  "dependencies": {
    "ask-sdk-core": "^2.7.0",
    "ask-sdk-model": "^1.19.0",
    "aws-sdk": "^2.326.0"
  }
}
Save and stage your changes to this file.
Going on the lambda
The real "meat" of our Alexa skill lies in the index.js file. This is where the logic and details live, including how to manage speaking text to the user and to receive and process input from the user.
index.js is typically the starting point for the skill. You can override the default skill script using the package.json file's "main" key/value pair.Let's take a moment to break down and understand the structure of a skill script.
- Predefined "require" calls effectively define dependencies
- The handlers are functions that define how to manage request, response, and fulfillment for a given intent, whether that intent is one Amazon provides, or one you have built.
- The
LaunchRequestHandleris responsible for the skill's initial response to invocation. Basically when a user says "Alexa, tea time", how should the skill respond? This handler is the single pathway into the skill. - The default file has predefined handlers for default intents we noticed from the
en-US.jsonfile earlier. You can see, and customize the skill's responses using these handlers, giving flexibility for the personality the skill takes with the user. - The
exportssection exposes the handlers for use. You can have functions called purely within the script and not have them exported.
Before we just start digging in, I've found that it's best to sort of outline what we need to do as a way to structure our actions and ensure we don't miss anything notable.
Here's our agenda for this script:
- Understand core functions of Alexa skills
- Add more dependencies
- Add support for calling Alexa's timers API
- Define the timer's defaults (time, timer name, what to see when the timer is done, etc)
- Customize & update the launch handler
- Review and update our spoken phrases for other handlers
- Review exports & ensure everything we need is there
Core Alexa skill functions
Okay, so now that we have kind of a task list, let's look at some definitions for core functions for an Alexa skill.
The following list of functions really represents the primary tools for building an Alexa skill. This is true regardless of whether you're building a simple skill or a super complex skill with dozens of nested and/or interfacing intents.
| Function | Description |
|---|---|
| speak() | Alexa will say the provided text out loud |
| reprompt() | Alexa will say the provided text out loud if there's no response to a previous ask for input from the user |
| withSimpleCard() | For Alexa devices with a screen - provides a card title and descriptive text in addition to the spoken output. |
| getResponse() | Listens for a user response |
| getRequestType() | A handler definition asking Alexa to match an intent for this function |
| getIntentName() | A handler definition asking Alexa to match specific intents to this function |
| handlerInput.responseBuilder | Respond to user input |
There are certainly more functions we could call, but these are the foundational building blocks leveraged by any Alexa skill to interface with the user.
Dependencies
We really only need a couple of additional dependencies vs the defaults provided. It's worth noting that these dependencies get resolved by NPM, so you have the flexibility to leverage any NPM libraries you're already familiar with.
We want to add support for Axios, for HTTP API calls. And also for Moment which is used for parsing and manipulating dates and times.
The top of your index.js should result in something like the following:
/* *
 * This sample demonstrates handling intents from an Alexa skill using the Alexa Skills Kit SDK (v2).
 * Please visit https://alexa.design/cookbook for additional examples on implementing slots, dialog management,
 * session persistence, api calls, and more.
 * */
const Alexa = require('ask-sdk-core');
const axios = require('axios');
const moment = require("moment");
Defining the timer
Before we get to invoking it, let's make sure we have constructed our basic timer details. This should happen immediately after our dependency definitions within the index.js file.
We first need to construct our timer, let's call it brewTimer. With this, we'll need to provide some attributes as required by Alexa's timers framework. This will include the duration of our timer (let's hard code it for 4 minutes), the label/name of the timer, some basic display experience details, and some triggering behavior definitions. Whew, it sounds like a lot, but it's not so bad when we take a look at the results.
const brewTimer = {
    "duration": "PT4M",
    "timerLabel": "Tea Timer",
    "creationBehavior": {
        /* Let's just hide this from displays for now */
        "displayExperience": {
            "visibility": "HIDDEN"
        }
    },
    /* Now we can define what happens when the timer triggers (time expires) */
    "triggeringBehavior": {
        "operation": {
            "type": "ANNOUNCE",
            "textToAnnounce": [
                {
                    /* You can have the timer say different things for different localizations */
                    "locale": "en-US",
                    "text": "Your tea is ready!"
                }
            ]
        },
        /* Should we sound an alarm as well? */
        "notificationConfig": {
            "playAudible": true
        }
    }
};
Our skill still isn't able to really do anything yet. The out-of-the-box HelloWorldHandler needs to be replaced, and we need to rewire some stuff, add API integration, and more.
Let's start with adding our API handling. There's no simple "Alexa, run a timer" function. So we instead leverage the timers API for Alexa. There are a couple of mechanisms for timers depending on how a timer is tied.
We could use the generic timer API, or we could use the Cooking Timer API. However, because the Cooking Timer API requires additional Smart Home dependencies, we'll just use the generic timer API.
To make this easy on the user, we're going to construct a handler for an ASK offered function called a YesNoIntentHandler. This is a combined handler, capable of mapping both a yes intent, and a no intent to one function, and we'll choose what to do based on the intent provided. We could do this in separate methods, but it's usually worthwhile to combine them since a no is often less code this way.
The following is my code for this. Note the references to the brewTimer. Also, note the structure of a handler matching one or more intents.
This block of code can be put anywhere AFTER the LaunchRequestHandler. I put all my custom functions and handlers after all the default Alexa-provided ones. This makes scrolling to the exports section a shorter trip when I need to update it or check if I missed something.
const YesNoIntentHandler = {
    canHandle(handlerInput) {
        return Alexa.getRequestType(handlerInput.requestEnvelope) === 'IntentRequest'
            && (Alexa.getIntentName(handlerInput.requestEnvelope) === 'AMAZON.YesIntent'
                || Alexa.getIntentName(handlerInput.requestEnvelope) === 'AMAZON.NoIntent');
    },
    async handle(handlerInput) {

        // User intent is a 'yes'
        if (Alexa.getIntentName(handlerInput.requestEnvelope) === 'AMAZON.YesIntent') {

            /* Here we use the Moment dependency for handling time */
            const duration = moment.duration(brewTimer.duration),
                hours = (duration.hours() > 0) ? `${duration.hours()} ${(duration.hours() === 1) ? "hour" : "hours"},` : "",
                minutes = (duration.minutes() > 0) ? `${duration.minutes()} ${(duration.minutes() === 1) ? "minute" : "minutes"} ` : "",
                seconds = (duration.seconds() > 0) ? `${duration.seconds()} ${(duration.seconds() === 1) ? "second" : "seconds"}` : "";

            const options = {
                headers: {
                    "Authorization": `Bearer ${Alexa.getApiAccessToken(handlerInput.requestEnvelope)}`,
                    "Content-Type": "application/json"
                }
            };

            /* Here we call the Alexa timers API using the axios dependency */
            await axios.post('https://api.amazonalexa.com/v1/alerts/timers', brewTimer, options)
                .then(response => {
                    handlerInput.responseBuilder
                        .speak(`Your ${brewTimer.timerLabel} timer is set for ${hours} ${minutes} ${seconds}.`);
                })
                .catch(error => {
                    const speakOutput = `Sorry, I had trouble starting that timer for you.`;
                    console.log(error);
                });
        }

        // User intent is a 'no'
        if (Alexa.getIntentName(handlerInput.requestEnvelope) === 'AMAZON.NoIntent') {
            handlerInput.responseBuilder
                /* The user said no, so we don't need to getResponse, we'll just close out */
                .speak('Alright I won\'t start a timer.');
        }

        return handlerInput.responseBuilder
            .getResponse();
    }
};
In the above block, we check to ensure intents are either a YesIntent or a NoIntent from Alexa, then if it's a yes we process the time configured using Moment, followed by constructing an API call to Alexa's timers API using a bearer token.
As you can see, the NoIntent handler is very simple. They said no, we formulated a verbal confirmation for Alexa to speak, and we let go.
We'll look at how we construct the bearer token in the next step, as we customize the LaunchRequestHandler.
Launch request handler
#TODO
Contextualize other statements
Other handler methods that are saying things to the user should have those statements contextualized. It feels awfully generic to say something like "I don't know about that" instead of "I don't think that's a tea timer thing, try another request."
Try updating the phrases spoken by Alexa for the following handlers to give the statements or requests context to our tea timer intents.
HelpIntentHandlerCancelAndStopIntentHandlerFallbackIntentHandlerSessionEndedRequestHandlerIntentReflectionHandler


Member discussion